Kitchen Jazz
  • Home
  • Contact
    • General Enquiry
    • Subscribe
    • Cooking Class Quote
    • Tour Enquiry
  • Classes
  • TOURS
    • Tours Summary
    • Crete
    • Latvia Tour >
      • Latvian Food
      • Latvia Facts
    • Morocco Tour
    • New Zealand Tour
    • Piemonte Tour
    • Provence Tour
    • Adelaide
    • Sydney Day Tours
  • BLOG & RECIPES
  • Gift Vouchers
  • Gallery

BLOG & RECIPES

Quick and Easy Strawberry Jam

5/4/2023

1 Comment

 
Picture
Click here to view on YouTube
Quick and Easy Strawberry Jam   Makes 1 cup
 
My quick and easy microwave recipe which takes less than 10 minutes to make!
 
 
200g strawberries, washed and hulled
160g caster sugar
2 tblspns lemon juice
 
 
Roughly chop strawberries and place into a large heatproof microwave bowl.
 
Microwave on high for 1 minute, uncovered, and stir.
 
Add sugar, stir and microwave on high for another minute, uncovered.
 
Add lemon juice, stir, make sure that sugar is now dissolved and microwave for another 2 minutes. Watch that mixture doesn’t overflow.
 
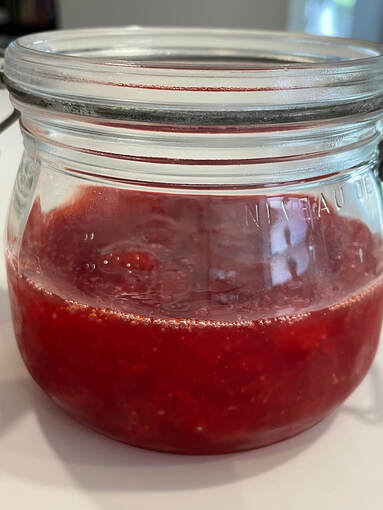
Allow to cool completely. Once refrigerated, it will set as jam – Delicious on pancakes or folded through whipped cream or yoghurt and will keep for a few weeks in a sterilized container in the fridge.
 
 
NOTE: Use oven mitts as sugar content can reach high temperatures.
 
 
To Make Fresh Stawberry Sauce:
 
Into a blender, add 2 tablespoons of this jam and 100g fresh hulled strawberries. Blend until pureed.

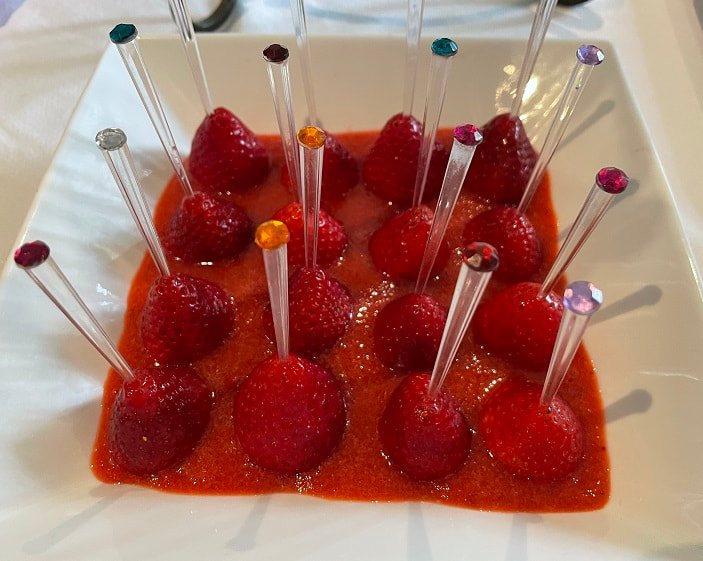
Below is a serving option for fresh strawberry sauce. Hulled washed fresh strawberries sitting on a bed of sauce.  Great for parties.
Picture
1 Comment

Cream Puffs / Choux Pastry

4/4/2023

0 Comments

 
Picture
Click Here to View on YouTube Channel
Cream Puffs Filled with Ricotta Cream  Makes 18-20
 
For Choux Pastry:
1 cup/ 250mls water
120g unsalted butter, cubed
Pinch of salt
150g plain flour
4 large eggs, room temperature
Icing sugar for sprinkling
 
For Ricotta Cream Filling:
375g smooth ricotta
3/4 cup (180mls) thickened cream
3 heaped tblspns icing sugar
1-2 tspns Vanilla bean paste or vanilla extract
 
To make the Choux Puffs:
Heat oven to 190DegC fan forced
In a med sized saucepan, heat water, butter and salt. Stir to melt butter.
 
Bring to a rolling boil, immediately add flour all at once and remove from heat. Stir vigorously with a wooden spoon until mixture comes together as a ball. Place back onto med heat and continue to cook for 1-2 minutes, stirring continuously until you have a starch film on bottom of pan. Place mixture into a large mixing bowl and allow to cool slightly, 4-5 minutes.
 
Lightly beat eggs and add them to flour mixture, a quarter at a time, ensuring that each quarter is completely incorporated before adding the next. Your choux pastry will now be smooth with a glossy sheen. (Retain the eggy bowl for later)
 
Spoon mixture into a large piping bag with a star nozzle and pipe pastry (roughly the size of an apricot) onto lined baking tray about 4cms apart. (Lift the piping bag directly upwards). Using your finger, wet with egg residue from your bowl and very gently press down any unwanted peaks. Bake for 35-40 minutes until crispy and deep golden brown. Remove and place on a cooling rack. Make a small slit on side to allow steam to escape. Cool.
 
To Make the Filling: 
Beat together all ingredients for 2-3 mins until smooth and peaked. Spoon into a piping bag. Cut puffs in half and remove tops. Fill with piped ricotta cream and replace top of the puff. Dust with icing sugar and serve.
 
 
In advance:
Puffs: Can be made day before and stored in an airtight container or frozen and defrosted. A couple of hours before serving, refresh in hot oven for 5-8 minutes until crispy again. Cool for 15 minutes before filling.
 
Ricotta Cream: Can be made the day before and stored in piping bag in the fridge.
 
Tip: Quick way to bring eggs to room temperature: place them in a bowl of warm water for 5-10 minutes.
 
 
Starch molecules swell when heated and absorb the liquid. Thus making the dough stronger. Although the starch loses its elasticity. When in the oven, the dough will rise from capturing the air and moisture and will be strong enough to rise and because of no elasticity, will not deflate back down again.
0 Comments

Raita (Cucumber & Yoghurt)

16/4/2021

0 Comments

 
Picture
Click here to view on YouTube
Raita     Makes 1.5 cups
 
1 Lebanese cucumber, ends trimmed and skin left on
½ clove garlic, peeled and minced
500g natural unsweetened yoghurt
1 tblspn lemon juice
2 pinches salt
Freshly ground pepper
½ tspn ground cumin
½ tspn ground coriander
1 tblspn chopped coriander leaves
 
Coarsely grate cucumber onto a towel and squeeze out excess water.
 
Mix all ingredients together in a bowl and adjust seasonings as desired.
 
Use as a cooling side dish for a hot curry or as part of a canape platter with mini pappadums and Indian chutney.
0 Comments

Fish Tacos with Mango Salsa

16/4/2021

0 Comments

 
Picture
Click here to view cooking demo on YouTube
Fish Tacos with Mango Salsa    Makes 6
 
For  Mango Salsa:
Into a mixing bowl, combine the following ingredients:
 
1 slightly firm mango, flesh removed and cut into 1cm dice
½ medium sized red chilli, membrane and seeds removed and flesh finely diced
2 tblspns lime juice
1 tblspn finely chopped eschallot or Spanish onion
1 tspn finely shredded mint
 
Check for seasoning and allow to sit for 1-2 hours for flavours to develop. It is best served on the day it is made.
 
 
For Fish:
3 Flathead fish fillets (or a firm fish that keeps its shape when cooked)
1 tblspn plain flour mixed with ½ tspn ground cumin, ¼ tspn sweet paprika, ¼ tspn salt
1 tblspn each of olive oil and butter
 
Cut fish fillets into smaller pieces (6-8cms long), pat dry and dust with the seasoned flour.
Heat a non-stick fry pan with  oil and butter and when sizzling, add fish. Cook for 1-2 minutes on each side or until cooked through. Remove from pan and sit them on a plate.
 
 
For Tacos:
6 soft round tortillas
Chipotle mayo: Mix together 2 tblspns mayonnaise with 1 tspn of chipotle powder (Or your favourite chilli flavouring)
Soft green lettuce leaves
1 cup shredded red cabbage
½ cup coriander leaves
 
Lightly grill tortillas on a pan or bbq and lay them out flat.
Spread with chilli mayo and then other ingredients in order:
Lettuce
Red cabbage
Fish
Mango salsa
Coriander leaves
 
Note:  Mango Salsa is delicious served with any seafood, chicken or simply by itself!


0 Comments

Table Salt vs Sea Salt

18/3/2021

0 Comments

 
Picture
Why Salts vary in intensity and influence our perception of salty tastes
 
 
This question was asked upon me at a friendly brunch which prompted me to do some research.
 
There are many different types of salts available, most commonly differentiated by sea salt and table salt.
 
Table salt is harvested underground from salt deposits as rock salt (in Australia to be found in WA and SA) and is commercially refined and ground. This removes any unwanted impurities and in the process, it also removes any traces of minerals. At this stage, it is pure sodium chloride. It then has an anti-caking agent added to avoid clumping and in many countries, iodine is added to prevent iodine deficiency.
 
Sea Salt is harvested through evaporation of seawater or saltwater lakes and results in larger coarser flakes. Because it is not highly processed, it retains natural minerals such as potassium, zinc, calcium, magnesium and iron. These minerals can influence our perception of salty taste and depending on the location of harvest, can vary greatly. When used as a food topping, the larger flakes of salt create a ‘pop’ of salt flavour at first taste intensifying our mouth feel. Varying thickness and textures of flakes will have different abilities to melt on the tongue and thus change the influence of taste throughout the process of ingestion, throughout chewing and after swallowing. This effect on salty taste can help us limit salt intake.
 
In summary, sea salt is a good salt for a topping and is a healthy and tastier option with the added minerals. Table salt with it’s added iodine is a good salt for cooking. To achieve the same amount of sodium chloride between table salt and sea salt, you will need to measure the same weight and not volume.
 
I suggest to use both sea salt and table salt and use to taste in moderation. Table Salt for cooking and Sea Salt for garnish/topping.

0 Comments

Ceviche Canapes with Avocado

18/3/2021

0 Comments

 
Picture
GO TO YOUTUBE CHANNEL TO WATCH VIDEO

​Ceviche with Avocado on Tortilla Crisps
  
​

Serves 6-8 as an hors d’oeuvre.
 This is a traditional Peruvian fish dish, refreshing and piquant on a hot summer’s day.
 
 
100g Flathead fillet (or sea bass, snapper)  Ask your fishmonger to remove bones and skin
Generous pinch of sea salt
Juice of 1 lime, 2-3 tblspns
½ eschallot, peeled, halved and thinly sliced
1 tspn finely diced med-sized red chilli, seeds & membrane removed
Pepper to taste
Half a small avocado, diced
Natural Tortilla crisps
 
 
Lightly rinse whole fish fillet with cold water and dry with paper towel.
 
Finely dice into ½ cm squares, place into a glass dish and toss with salt. Add lime juice and mix. Scatter with onion slices and refrigerate while you prepare the rest of the dish.
(At this stage, you can leave any time between 15 minutes to 2 hours).

 
When ready to serve, add diced chilli and mix. Season to taste.
 
TO SERVE:  Press down diced avocado onto tortilla crisps and top with a spoon of ceviche. 
 
 
Notes:

  • Avocado can be prepared 1-2 hours in advance by mashing together with a little lime juice.
 
  • Ceviche is raw fish which is ‘Cooked’ by curing with salt and acidity. This preserves the fish. It can be served at once and be raw. Left for a further 15-30 minutes, the fish will become opaque and cured on the outside while raw in the centre. Left overnight and it will be cured all the way through. It is up to your personal taste.
 
  • Add chilli just before serving if you dont like it too spicy.
 
  • Delicious with margaritas, cold white wine such as a Pinot Grigio or beer.
 
0 Comments

Preserved Tomatoes

25/10/2020

0 Comments

 
Delicious on an antipasto platter - Full of flavour and colour
Picture
​Preserved Tomatoes  
 
1 kg ripe Roma tomatoes  (approx 18 med sized)
Freshly ground black pepper
3 garlic cloves, peeled and minced
1 tspn dried chilli flakes
small handful of fresh small oregano leaves
60g finely grated Pecorino cheese
extra virgin olive oil
 
Preheat oven to 140deg C
 
Bring a large pot of water to boil and remove from heat. Add tomatoes for one minute only until skins soften slightly.
 
Drain immediately and allow to dry on paper towels. Cut them in half lengthwise and give them a gentle squeeze to remove excess liquid. Lay out on a baking sheet and bake for 40-45 minutes. 
 
In the meantime, prepare the filling by mixing together garlic, chilli, oregano and grated Pecorino.
 
Pat dry tomato halves and sprinkle with freshly ground pepper. Take one tomato half at a time, dip inner side into filling and sandwich together with the other half. Place into a sterilised jar, one after the other, until you reach the top. Cover with extra virgin olive oil, close tightly, and store in a cool place. Will last 1-2 weeks in the fridge.
 
Note:  If you want to keep them longer, the tomatoes will have to be drier - and omit the cheese.

0 Comments

Turkish Style Pita Pizza

11/9/2020

1 Comment

 
Picture
GO TO YouTube CHANNEL TO WATch video of how to make the pizza
​Turkish Style Pita Pizza      Makes 2 pizzas
 
500g lamb mince
1 tblspn olive oil
1 onion, peeled and chopped
2 garlic cloves, peeled and crushed
1 tspn ground cinnamon
1 tspn paprika
1 tspn ground cumin
½ tspn ground ginger
½ tspn salt
½ tspn ground black pepper
1 tblspn pine nuts
Extra salt and ground white pepper to taste
2 tblspns tomato paste (1 tblspn per pita base)
Grated cheese (Mix of cheddar and mozzarella)
 
To garnish:
100g feta, crumbled (I like smooth and creamy)
1 tblspn each of chopped coriander and parsley
Extra virgin olive oil
 
Base: 2 x Greek pita bread 
 
Heat oil in a large frying pan on medium low heat and cook onion and garlic gently until translucent, stirring regularly.
 
Turn up the heat to high and add lamb mince. Stir constantly until meat is cooked and most of the liquid has evaporated.
 
Add spices and pine nuts and stir through. Cook until excess liquid has evaporated and meat starts to brown and caramelise.  Add white pepper and extra salt to taste. Allow lamb mixture to cool. At this stage, you can refrigerate or freeze until required.
 
Place pita bread onto oiled baking trays and spread with tomato paste. Sprinkle with grated cheese and then a generous amount of cooled lamb mixture.
 
Bake in a hot oven (200 deg fan forced) for 10-15 mins until base is golden and edges crusty.
 
Remove from oven and sprinkle with feta and herbs, drizzle with extra virgin olive oil and serve straight away with a huge smile on your face.
 
1 Comment

How to Make Sauerkraut (Fermented Cabbage)

11/8/2020

0 Comments

 
Picture
For the full recipe and notes on making your own sauerkraut, keep scrolling down in this blog or go direct to May 2020 in the Archives.  Sauerkraut is delicious, easy to make and great for your gut health.
Go to YouTube Channel for Sauerkraut Video
0 Comments

Roasted Cauliflower, Freekeh and Herb Salad

16/7/2020

2 Comments

 
This recipe supports the video on Kitchen Jazz YouTube channel
Go to Kitchen Jazz YouTube Channel
Picture
Roasted Cauliflower,  Freekeh and Herb Salad  Serves 3-4
 
1 small head of cauliflower, broken into approx. 2cm florets
1 tspn cumin seeds
3-4 tblspns olive oil
½ cup cooked Freekeh (follow packet instructions) or use a gluten free alternative (see below)
½ cup finely chopped parsley and chives (or a mix of your favourite green herbs)
2 large green shallots, finely sliced white and green sections
½ cup almonds with skin, roasted in 180C oven for 10 minutes (fan forced)
Extra 2 tblspns olive oil
1 tblspn lemon juice
1 garlic clove, peeled and crushed
Sea salt and freshly ground pepper
 
Heat oven to 180C fan forced
 
To Roast the Cauliflower: In a bowl, mix together cauliflower florets, olive oil, cumin seeds, salt and pepper. Place on a lined baking tray and bake for 25-30 minutes, or until cooked to desired texture. (Toss halfway)
 
To Make the Dressing: Mix together 2 tblspns olive oil, 1 tblspn lemon juice, garlic, salt and pepper.
 
To Compile the dish:    Roughly chop the almonds in half diagonally.
 
In a large mixing bowl, place cauliflower, cooked freekeh, herbs, shallot and optional pomegranate arils. Mix together with dressing and just before serving, fold through half of the almonds, reserving some for a crunchy topping.


Notes:
Freekeh can be cooked in advance as it keeps well in the fridge for a few days. It is derived from green wheat and can be substituted with rice or quinoa for a gluten free alternative.
 
Optional extras: fresh pomegranate and feta

2 Comments
<<Previous

    Archives

    April 2023
    April 2021
    March 2021
    October 2020
    September 2020
    August 2020
    July 2020
    June 2020
    May 2020
    December 2019
    August 2019
    March 2019
    February 2019
    December 2018
    June 2018
    March 2018
    February 2018
    November 2017
    May 2017
    March 2017
    January 2017
    December 2016
    November 2016
    September 2016
    August 2016
    July 2016
    June 2016
    May 2016
    April 2016
    February 2016
    February 2015
    September 2014

    Categories

    All

Good Food ~ Good Times                      
​
Ph +61 (0) 405 101 229

Join  Mailing List

  • Home
  • Contact
    • General Enquiry
    • Subscribe
    • Cooking Class Quote
    • Tour Enquiry
  • Classes
  • TOURS
    • Tours Summary
    • Crete
    • Latvia Tour >
      • Latvian Food
      • Latvia Facts
    • Morocco Tour
    • New Zealand Tour
    • Piemonte Tour
    • Provence Tour
    • Adelaide
    • Sydney Day Tours
  • BLOG & RECIPES
  • Gift Vouchers
  • Gallery